WELCOME

Thanks for taking the time to have a read of my Heart & Soul blog. You are welcome to leave a comment & any tips about scrapbooking or anything at all really!
LIVE WELL, LAUGH OFTEN, LOVE MUCH.
Happy Scrapping from Susan.

Saturday, March 30, 2013

Easter blessings


20% off plain cardstock
 

This background page was created by using a mask and mist sprays as the first layer. Then lay the misted mask over onto the cardstock to give a negative image( and it doesn't waste any ink then.).
An embossing pen was used to outline some of the masked images and embossing powder was sprinkled on and heated. Texture paste was used with some of the masks and when dry it was sprayed with mist spray.

The right side of this layout was sprayed with mists over a mask. The swirl paper on the left was to create a mirror image effect.

Wednesday, March 27, 2013

Memory Maze in March

Hi again from Susan and I have a few more ideas that you can use with chipboard.
It is quite versatile and can be used with layouts, cards and off the page projects.
MEMORIES
Chipboard looks good on projects such as mini albums and albums. I wanted somewhere to keep the layouts I am making with the Memory Maze products to showcase all their wonderful goodies. It didn't really show up in the photo but the album was misted with glimmermist before the patterned paper was adhered.

The frame was painted with Tim Holtz crackle paint in tea dye. Cream rub in gold was rubbed lightly over sections to create a shimmery effect. I used Helmar tacky glue to adhere the frame to the front of the album so it would be really secure. For smaller chipboard pieces I use double sided tape, acid free PVA glue or dimensional magic/crystal glaze.

I find chipboard so versatile to work with because you can alter and embellish it in so many ways. Just adding stick on pearls and small flowers really dresses it up.

MEMORY MAZE PRODUCTS USED
Vow Chandelier
Memories GO193

Other Products
Kaisercraft classic rhinestone flourish in silver & coloured with alcohol ink in lettuce, Bella 3D ring binder, crackle paint in tea dye, ink and stamps, K & Company-Que Sera Sera, flowers & leaves, Glimmermistin Mustard seed, pumpkin & cranberry zing.
.................................
BLESSINGS

Easter time means different things to different people but I think it is a good time to reflect on the many blessing we do have in our lives regardless of what is going on around us. My family is my greatest blessing and the biggest part of my scrapbooking reflects this.....and they have all grown quite use to me photographing pretty much everything about them!! LOL!

As this is a layout of my grandson, I didn't want anything to flowery or swirly so the chick and eggs fitted perfectly in with the theme. They were first painted with LumiArte and the chicks were coated in distress stickles to give a textured look. The feathers were added to reflect the softness of the chicks. A gem was used for the eye of the chick.


On the sign I used Radiant Rain in nutmeg and smooch in molasses to give shadowing and depth to the piece. It was then coated in distress crackle paint in rock candy to give an aged look to it. I backed the opening of the sign with patterned paper stamped with the word blessings. A cute butterfly just dresses up the sign and butterflies are sometimes connected with Easter, like eggs, bringing new life.

MEMORY MAZE PRODUCTS USED
Vintage sign so459
Chick & eggs large
Chick & eggs small
easter eggs

Other Products
Basic Grey-rosales, We R Memory Keepers-elegant, felt leaves, Kaisercraft stickers, feathers, gems, tags, butterfly, handmade rosettes,Smooch, radiant rain, distress crackle paint & lumiarte.
.........................................

GRANDAD
This layout has special meaning for my hubby & myself as our grandson died when he was 4 months old from SIDS nearly 3 years ago now. It has taken me awhile to scrapbook these photos and even though it was a bit upsetting I found that by journalling about it helped and I put it on the tag tucked behind the photo. We only have a few precious photos and this is why I believe preserving our memories and everyday happenings (both good & bad) is so important. I love the expression on Cooper's face as if he is saying, "Don't talk to me Pop, I'm trying to sleep!"

To colour the old bike I used grey marker pen on the spokes of the wheel and Smooch for the seat, handle bars and frame. I like using smooch on the more detailed bits of the chipboard because it has a fine brush to keep it neat. Dimensional Magic was used on the tyres and frame to create a glossy look. Chipboard is great for layering under things as well as layering bits and pieces on top of it.
The border hook was simply coloured in with a marker pen. The beauty of the Memory Maze Designs chipboard is that it looks good plain or dressed up!


Clustering your elements together makes for a more unified look to your projects. I used acrylic paint to colour the balloon and mist spray for the words. It's probably hard to see but I put distress stickels on the basket of the hot air balloon to add texture. It was all layered together with an inked & stamped tag and other embellishments.

Grandad was sprayed with the same mist used on the other words and when dry was coated with distress stickles in denim

MEMORY MAZE PRODUCTS USED
Grandad SO579
Old bike SO606
Border hook1 SO147
precious GOO19
memoriesGOO14
hot air balloon
fob watch CO151

Other Products
Paper Inklings-Family-grandfather, Kaisercraft-Sears & Sons-moustache & Collectables,tags, various metal embellishments, memory mist, distress stickles, dimensional magic.
.................................................................
I hope you enjoyed viewing these layouts as much as I enjoyed making them.
Happy crafting..........Susan.


Friday, March 8, 2013

You are my Sunshine

It might be great weather for staying indoors and making some craft but where oh where is our sunshine?!! I guess we can complain about it or just enjoy the change of season and get on with our everyday lives.

On this layout I used Memory Maze chipboard for the 2013 and the map of Australia. The map was embellished with stickers and bling and inked around the edges while the word Australia was coloured in with a distress maker pen. 2013 was inked and then topped with distress stickles in denim. The banner is handmade and the swirl is from Flourish With A Bling.


Tuesday, February 26, 2013

Memory Maze Designs

Hi and here are my first designs for the Memory Maze design team....   
'PERFECT"
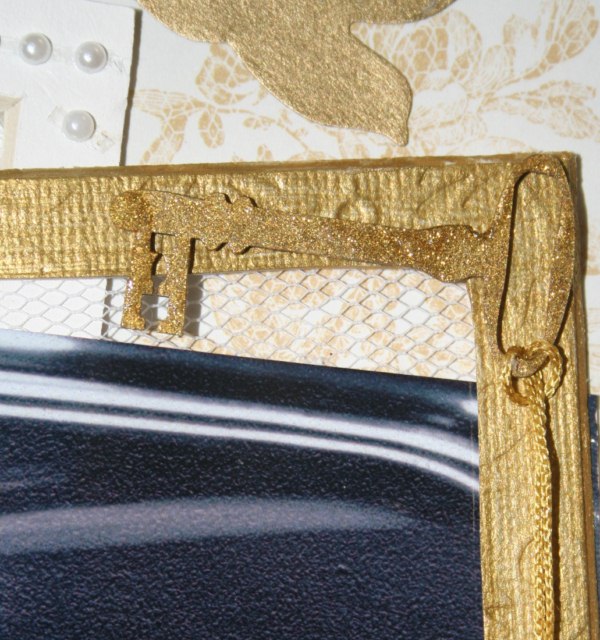
I wanted to highlight my Mum & Dad's wedding photo so kept the layout colours to gold and white and used texture to add interest to the layout.

The small square frame was covered with embossed paper and painted gold. The larger frame was painted white and pearls strips were adhered around the edge to give it a 3D effect.
"Perfect" was painted white then Plaid-  Folk Art Extreme Glitter in gold was painted over the top.
The wrought iron heart was painted gold with the gold glitter painted over the top of it.
The vintage corners were painted in vintage gold acrylic paint.
The embossed paper was adhere behind the white frame.

The key was undercoated in gold paint then gold glitter was painted over it. The tassel was attached to the key before it was adhered to the smaller frame. The photo and the tulle were adhered behind the frame before putting it on the layout.
 
MEMORY MAZE PRODUCTS
Vintage Corners   CO139
Old Key   COO30
Wrought Iron Heart   25
Perfect   GO196
Square Frames-mattboard Square set of 9   50-290
Embossed Paper-cream embossed rose   HMP007
 
OTHER PRODUCTS
white bazzill bling, papermania-confetti, skeleton leaves, tassell, tulle, flowers, letter & verse stickers,die cut bird, gold & white acrylic paint, plaid folk art extreme glitter in gold.
.......................................................
"2012"
Even though these photos were taken at the beach I wanted the layout to be about the motorbike and the "boys being boys". So I added all the grungy raised pieces to give this effect.
To make this layout I first laid the photos where they were to go and marked around them with a pencil as I needed an outline to know where to stop putting the different mediums and embellishments. I put a strip of mesh tape in the corners and sponge on the pewter distress stain then lifted the tape and moved it to overlap the stain and the black background. I laid a mask of cogs next to the tape (top & bottom) and spread texture paste over this and down to where the photos were to go.
The chipboard pieces were decorated first and all the embellishments were laid out ready to go. I pushed and placed these into the texture paste and left it all to dry. Check to make sure the photos still fit in before it dries so you can move things if you have to but don't stick the photos down yet!
Once dry, I painted over everything with black gesso, leaving the silvery areas untouched and used my finger to smudge some gesso over the edges so it blended in without leaving a distinct border.

Areas of the layout were highlighted with the distress stain to give depth to the items and not make them look flat and all one colour. When the gesso was still wet I wiped across some of the metal pieces to show the details of the embellishments.

The motorbike was first sprayed all over with memory mist then black gesso was smeared on to give a shadowing effect. Brushed pewter stain was applied to hightlight the "chrome" areas of the spokes, guards and handlbars as well as on the rider to give light and shade to the figure. Distress Stickles (like glitter glue but without a lot of glitter) was used on the tyres to give them "tread" texture.

Distress Stain in Brushed Pewter was applied all over the 2012 then black gesso was smudged on using my fingertip pressed onto it. Distress Stickes in Pewter was dabbed around the edges of the number.
 
MEMORY MAZE PRODUCTS
Heel Click (motorbike)   SO516
2012   CO122
 
OTHER PRODUCTS
black cardstock, Tim Holtz Distress Stain & Stickles - brushed pewter, texture paste, black gesso, mesh tape, assorted metal and plastic embellishments.
...................................................
"BLESSINGS"
With Easter on its way I thought this would make a nice "candy sweet" card.
The rose ribbon corners from the 3D Stackums were fussy cut and layered under the stamped tag. Gems were stuck on the corners to finish the tag. The front edge of the card was punched with a Martha Stewart border punch. The edges of the tag and the embossed paper were smudged with pink ink.

The bottom layer is handmade patterned tissue paper. The top layer of cream embossed paper has been lightly brushed over with pink ink. The bows were cut out from the 3Dstackums and layered together with the chick on top.
The chick and all the eggs were painted with  pink, silver and gold glitter paint.
 
MEMORY MAZE PRODUCTS
Chick & Eggs   CODE
Eggs   CODE
Cream Embossed Rose paper   HMP007
handmade pink tissue paper
3D Stackums- CODE
 
OTHER PRODUCTS
ric rac ribbon, gems, stamp & ink, white bazzill bling cardstock
...........................................
I hope you have enjoyed seeing these layouts and card and have found some new ways to use your chipboard pieces.


Friday, February 22, 2013

Just a Reminder

Just a reminder that our 20% off sale finishes at the end of February so come in for some great bargins and don't forget about our rewards card too.

Here is a quick card sketch from "Flourish With A Bling" Check out their blog for other great ideas.
Also keep an eye out here towards the end of next week for my first layouts on the Memory Maze Design Team. Check out their website, blog and facebook page as well.

Tuesday, February 12, 2013

Exciting News

Well here is my exciting news-I am a member of the Memory Maze Design Team. I am part of a wonderful talented team and watch out for all that is to follow.
I am also looking forward to scrapbooking all the photos I took of my grandchildren while I was away. Happy Valentines Day for Thursday and Happy Scrapping.
This is a printed calico piece that has been attached to a canvas background with jac paper(sticky double sided sheet) The edges of the canvas were covered in texture pasted and stamped using foam swirl stamps then painted when dry. I used mists and masks on the canvas and layered the embellishments on the top. The love letters are painted with acrylic paint and then coated in clear crackle glaze.

This black and white photo was the inspiration for the design of this layout. ...the colours and the oval shape the photo was cut out to.


Saturday, February 2, 2013

Love is all around...

inking & embossing using chipboard chickenwire to create the embossed pattern

fussy cut flower from patterned paper & layered

hand stamped tags to embellish the layout
February is the month of love...and lots of heat and rain too! Hope everyone is safe and dry. I am heading to Brisbane for a week to see my new granddaughter and catch up with family & friends. And yes lots of photo opportunities!! I have some exciting news that I will share when I return. Check out the classes for February & the changed opening hours. I have streamlined the days and times to suit when everyone wants classes. Freebie Friday is now going to include hands on, make & take items that can be included on cards or layouts  or kept as a reference on different techniques.