WELCOME

Thanks for taking the time to have a read of my Heart & Soul blog. You are welcome to leave a comment & any tips about scrapbooking or anything at all really!
LIVE WELL, LAUGH OFTEN, LOVE MUCH.
Happy Scrapping from Susan.
Showing posts with label Challenge to Try. Show all posts

Wednesday, February 5, 2014

Be Inspired

So today I have some inspiration from Archiscraps so have a go and jump on their blogspot for a bit of fun.
Here is the picture for February with the additional criteria of "travel"
 
Here is my take on the picture. I used the pocket page protectors to give the block effect and my travel was to the Devil's Marbles in the Northern Territory in Australia.
 
 
This was January's picture with the added criteria of music.
 
 
The peaks of the Opera House were reflected in the curves of the doiley mat and the punched edge along the bottom. My neice is very musically talented and her 18th birthday party was musically themed.


Happy Scrapping and enjoy your day....


Tuesday, September 24, 2013

Happy Memories

  I have a couple of layouts with lots of fablous chipboard to share with you today.
HAPPY MEMORIES

I found my inspiration for this layout from the "White With One" challenge were "the one" is pistashio. I used the double barbwire as a frame to look like branches and not as barb wire. This photo was taken in our two boy's cubby house which was on stumps and was surrounded by gum trees.

The swirl was sprayed with Perfect Pearls in Heirloom gold and dotted with dimensional pearls in lettuce.

The barbwire was sprayed with Perfect Pearls in heirloom gold and distress stickles in crushed olive was smudged along them. The banners were painted with dimensional pearls in lettuce. The camera was sprayed with perfect pearls and the lens was painted with smooch in green.

Memory Maze products used:
Mini camera(set) SO774
Swirl 4a SO419
Banner(set)

Other products used:
Tattered Angels mist-mustard seed, Basics Pearls-green, Bazzill Bling-white, Kaisercraft-doilleys, Flourish With A Bling-Jack-green, Smooch-green, Dimensional Pearls-lettuce, Perfect Pearls-heirloom gold, Distress Stickles-crushed olive.
....................................................................................

ALL GIRL

I made this layout for a challenge at "Scrap Around the World" and the inspiration board was black and white. I painted black gesso on the top and bottom and then used crackle paint over a mask.

I painted the lily with black gesso and dabbed the center with black glitter glue.

The swirls were painted with black gesso and dabbed with black glitter glue.
A simple but effective treatment for the chipboard.

Memory Maze products
Lilly 2209091
Small swirls

Other products used
Gesso, Glitter glue, Tim Holtz film strip, paper rose, Kaisercraft rubon-girls rule & elegant black pearl flourish & tissue tape, white card & velvet ribbon

Friday, September 20, 2013

Another Challenge!

Yes here is another one. I spent yesterday finishing off layouts and photgraphing them which was difficult as my beloved camera has decided to start not woking properly! So here we go.....
This challenge was from www.archiscraps.blogspot.com.au and I knew which photo I was going to use as soon as I saw the challenge picture.


The Memory Maze Chipboard Arch (lo185) reminded me of a stained glass window. I sprayed a piece of gloss card with Ink Potion No.9 and dripped on Tsukineko ink in teal, lavendar and marine.
The arch was coated in Distress Stain in black soot and when dry it was adhered to the gloss card with Dimensional Magic. The window panes were coated with dimensional magic to give them a glossy look.

The Memory Maze swirl was coated with grey, purple & black ink then glitter glue in antique silver was smudged in places on the top.

The column was dabbed with tan and brown ink then distress stickles in antique linen was dragged along it.
I hope that this brings you some inspiration too and that you are challenged to give something new a go. Maybe find some of your old embellishments and have a go at revamping them to fit in with your layout.


Scrap Around the World Challenge

I have been doing more challenges to have some focus for finishing the layouts I have started and not have half a dozen on the go and none finished!
This challenge is from scraparoundtheworld.blogspot.com and it can be interpreted how you like.

Here is my take on this sketch and mood board.


I painted black gesso on the top and bottom of a white sheet of card. When dry, I painted Distress Crackle paint in picket fence over a mask.
The backing to the photos is washi tape and negative tape.


The Memory Maze lilies and swirls were painted with black gesso and antique silver glitter glue was smeared over the top.


Friday, August 23, 2013

Challenged

Something I planned on doing this year is to do the challenges on different sites. "life is what happens when you are busy making plans"....which means I haven't done as many as I would have liked.
This challenge is from www.scraparoundtheworld.blogspot.com.au

This sketch really caught my eye but I wanted to do a male layout that was a bit grungy. I took the cake colours for inspiration off the board and contrasted them with the blue like in the photos. I misted with a pearly yellow spray to reflect the gold of the jewellery.

The chipboard I used on this layout is from Memory Maze Designs.


The arrows (arrow set LO199) were sprayed with Memory Mist in sparkling silver and Tattered Angel Mist in sapphire blue, then stamped over the top.

The small swirls were inked withColorbox ink in topaz and coated with Distress Stickles in dried marigold.

The title( SO515) was sparayed with Memory Mist in sparkling silver then stamped over the top using black ink.


Tuesday, July 23, 2013

Cards For You

I haven't made cards in awhile and with a couple of rainy days I made the time to have a play! I am also making some kits using Kaisercraft Summer Breeze range...It is an idea out of their magazine...soon to be completed and I'll post the photos of them.
These cards were made from my left over bits stash! I keep the papers filed by their colours in plastic envelope folders so it is easy to find what I want. I also find papers that go together quite easily.

The smaller pieces of card and paper I keep to fussy cut and to make tags and journalling blocks.

Odd flowers and left over cut pieces of bling and swirls go together nicely. Big tags can be cut to size to fit on smaller projects. Some stamping personalises your projects and adds that special touch.


Thursday, July 5, 2012

Christmas In July

I know it's not really Christmas but a lot of people like any excuse for a party and will celebrate. Here are a couple of Christmas layouts. It could be a good time to catch up on any scrapbook pages from last Christmas that weren't completed yet. Or if you are really organised you can get started on this Christmas's cards!! A quick way to achieve this is to have a production line/mix and match system with the card, paper and embellishments. This takes the guess work out of trying to come up with a lot of different designs.
The poinsettia embellishments in these layouts were made by cutting out patterned paper, then layering the flowers and topping them with clear acrylic flowers from "Kutalicious" and these were coloured using alcohol inks.


Inspiration for July
Memory Maze


"Kutalicious" is a Queensland local company that produces acrylic embellishments. Their range includes words, shapes, numbers in clear, white, black or mirrored acrylic.
"Memory Maze" is also another local company specializing in chipboard of a very high quality. Heart & Soul stocks both these company's products so come and have a look at our range and how these products can be used in your cardmaking, layouts and crafts.


Saturday, November 26, 2011

Christmas Photo Shoots

Summer is only a few days away & so are lots of photo oppotunities with Christmas, holidays & celebrations. Try a few different sorts of shots this year as well as the usual posed ones. If you like to take a family shot for your Christmas cards & letters give the kids a pile of Christmas decorations & dress up bits & pieces & see what they come up with. Sometimes the spontaneous photos are the best ones-not always perfectly posed but lots of fun! I took the Christmas tree outside one year when my boys were teenagers & then the the camera up on the tripod with the automatic setting on. It took us about 20 shots before we took one with us all looking at the camera. All of the other shots had us tallking, laughing & being silly. It turned out to be a fun afternoon & we eneded up with some great photos & good memories. I don't worry too much if I don't get the "perfect" photo... if that is all I have I scrapbook it anyway & tell the story behind it.
This layout has photos of my son & grandson at the beach. I was sitting a little way up the shore & zoomed in on them . My grandson wasn't too sure about going in the water & as soon as he had a splash & a play, he was out of there. The photos were nice natural shots & I really like the photo of them walking down to the water, hand in hand. It is a different angle where you can't see there faces but it still shows emotion. The layout is quite simple with a plain backing & the patterned sheet is distressed & inked. A few readymade embellishments finishes it off nicely.
 These flowers are off a layout I made but their colours weren't quite right. I used mist sprays to change the colour of the paper flowers to help them match in better with the colours of the layout. The smaller ones were a light lilac colour & I gave them a light spray with a silvery black colour to darken them slightly. Just because some embelllishments don't suit what you want still take a second look at them & see if they can be altered to fit in. Flat flowers can be inked, stamped & rubons used on them. Other flowers can be scrunched, layered, pulled apart or flattened. Flowers aren't the only embellishments that you can alter. Take a look at some of your older embellishments that have been sitting around for awhile & see what you can do to revamp them..just have a play.

Tuesday, November 23, 2010

November Challenges

This tag is one I did for a challenge on sketches 4 you. It had to be non-traditional Christmas colours with something shiny. I Chose pink & turqoise with white glitter embossing powder & pearl paint. I made a string of beads in the colours I chose with bling & pearls to match. There is a tag a week for the next 3 weeks so there will be more to come!
This layout challenge was a combination of 3 challenges. 1)Stash challenge-using circles 2)scrap lift from a sketch 3)make own embelllishments. For 1) I used a circle mat & used circle embellishments. 2) is from the sketch but I replaced the rectangular mat with a round one. 3) I made the flowers from a punched scallop circle with twisted tulle on the top with a button in the center. The background was masked & sprayed with glimmermist. It was all a lot of fun! Have a go if you like & see what you can come up with.

Thursday, August 26, 2010

Scrapbook layout challenge

Well here is my version of the blind scrap challenge. I followed the instructions to how I thought they were written. It's amazing how different people interpret things. I stamped around the edges with white ink & inked the edges of the papers. The picture of the camera is cut out from patterned paper. I hope you are happy with how your layout turned out.

Thursday, August 12, 2010

A Layout Challenge For You

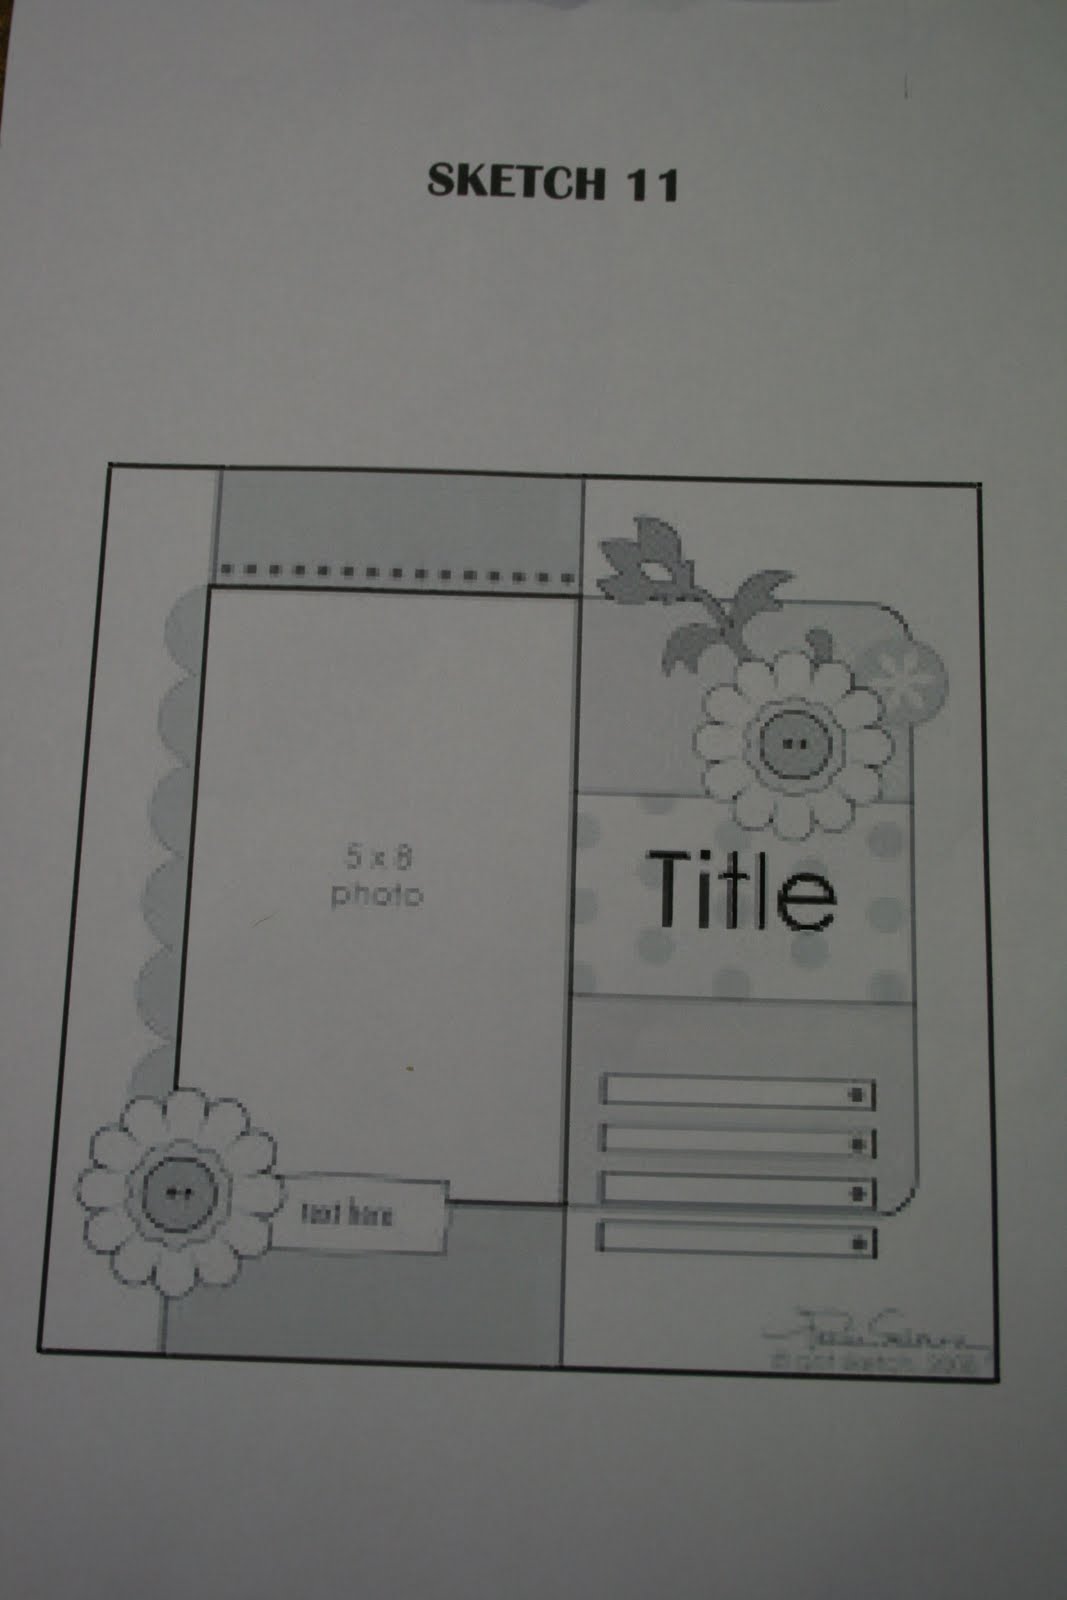
This is a blind challenge for everyone. It is where you have the supply list & the instructions but no layout to copy from so it is left up to your interpretation & imagination. I haven't done this yet so I can't even show you how mine has turned out...yet. I found this in an old craft magazine so here are the details. Read all the way through first before starting the layout then go step by step.
PHOTO: 5in x 7in landscape or a series of smaller photos to make up that size.
SUPPLIES: 1x cardstock, 2x coordinating pattern papers, 2x scraps patterned paper(12in long by 4in wide), 2 photo corners-bought or self made, 3 buttons, 1 large embellishment of choice, 1 alpha for one-word title, small alpha or pen for journalling, ink, sandpaper, all basic tools & adhesives.
STEPS:
1)On your base cardstock, doodle/stamp/use rub ons along the edge to create a border.
2)Take one of the pieces of scrap patterned paper, trim it to 11in & tear along the base so it measures about 2 1/2in x 11in. Ink the edges.
3)Adhere this piece towards the bottom of the cardstock.
4)Take one of the full sheets of patterned paper, measure across to the right about 9in & tear down. Next,measure down on the left about 8in & tear across.
5)This piece should measure about 9in x 8in with the left side & top straight-edged and the right side & bottom torn.
6)Adhere this piece so that it sits on top, slightly overlapping the first strip.
7)Create an edge to your pphotos by either sanding or inking the edges or both.
8)Take the second sheet of 12x12 patterned paper & matt your photos on it.
9)Ink the edges and adhere on top of the patterned paper & layer with the 2 torn edges.
10)Take the last scrap patterned piece, cut a 1in x 11in strip and a 1/2in x 11in strip.
11)Ink the edges and adhere the 1/2in strip on top of the 1in strip.
12)Next, adhere this strip so it overlaps the 9in x 8in piece and sits below your pphotos but above the torn edge. Ink all the edges.
13)Adhere your two photo corners to any of the other photo corners.
14)Adhere the buttons to the 1in strip.
15)Adhere the large embellishment to the bottom right of the photo.
16)Place a one-word title at the top or bottom of the photo, making sure is overlaps a little of the photo.
17)Journal on the right side of the page, near the photo/s.
HAPPY SCRAPPING & let me know how you went with this challenge.

Tuesday, May 18, 2010

Layout challenge 10 &11


Layout 10 uses the EK Success chain punch along the top & the bottom of the page. I distressed & inked the edges of the paper pieces. I also used the notepaper edge punch and a lacy punch around the red mat piece. On layout 11 I used ready made chipboard embellishments, stickers & paper flowers for a quick & easy layout. I distressed & inked the edges of the front patterned sheet 7 then mounted the whole layout onto a plain sheet as a backing with the edges showing through.


Wednesday, April 7, 2010

LAYOUT CHALLENGE


Here are the sketches & layouts for week 8 & 9 of the challenge. I was hoping to spend Easter catching up on some scrapbooking but instead I helped David put timber decking in our breezeway-it looks so much better & makes it into a lovely useable space. Week 8 layout is called "Good Life" & the I used alcohol ink on the clear acrylic letters to make them stand out. It was a quick layout as I used ready made embellishments. Week 9 is all about a cat I use to have (not own, as cats don't have owners, they have masters!) that whenever I sat down to do any sort of craft she would run into the room jump up onto the table & skid across my stuff...then proceed to roll around & tangle herself in whatever she could & attack me if I tried to move her! I think it was because she wasn't the center of attention!! I used twisted ribbon & tore sections of the paper to reflect her actions. I had ready made embellishments & stickers in a cat theme so I used these to keep it all together.